How can we help?
< All Topics
Print

Dynamically change font size

Sometimes, it makes sense to let the end-user dynamically change the font size. This makes sense for people with bad eyesight but also in case there is a lot of text which should fit on one page.

Below you will learn how to add what-if-scenario slicers to the report and use a combination of DAX and HTML to let the end-user dynamically increase or decrease the font size of the text.

Below you can find the sample report. Just interact with the slicers to see how the font size changes

Adding the slicers

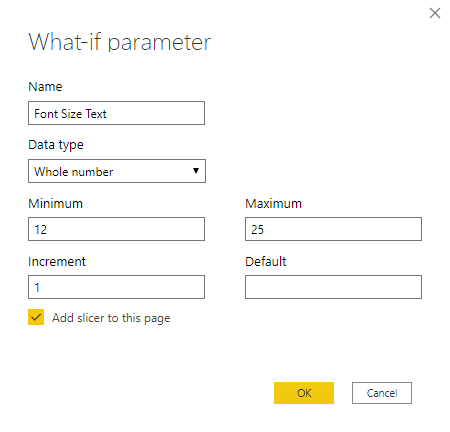
Select Modelling -> New Parameter . This takes you to the What-if Parameter window. Here we must specify a Parameter Name, Data Type, Min & Max Values for the slicer, and the slicer's increments. Also, we can define an optional default value. By default, the add slicer to this page option is already activated, which is good as we want a slicer to change the value which we will use to define the font size.

You will see that adding this What-if parameter adds a new table with a measure to the data model. This measure is the one that we will refer to later on

In the sample file, there are actually 2 slicers which means that the steps above were performed twice.

Adding the DAX and HTML code

The code which is used in the sample report reads like this:

Dynamic Text = "<span style='font-size: "&[Font Size Title Value]&"px;'>Lorem Ipsum</span> <p><span style='font-size: "&[Font Size Text Value]&"px;'>"&SELECTEDVALUE(Comment[Text])&"</span></span>"
This is how the code works
"<span style='font-size: ": <span> is an inline container used to mark up a part of a text. We combine <span> with the font-size attribute which is used to define the font size &[Font Size Title Value]&"px: This is where we take the currently selected Font Size Title Value from the slicer and combine it with px which stands for pixels. This lets us display the text in the font size selected in the measure. 
>Lorem Ipsum</span>: This is where the <span> tag is closed. After that, the hardcoded Text Lorem Ipsum is entered. We do this because in this sample, the title is not coming from a data source but is entered directly in the Measure. For the main text, this will be done differently as you will see below. 
</span>This defines the end of the previously opened <span> container so this line of code is now finished.
The second line of the code is very similar so we will only focus on the elements which are different
<p>: This defines the beginning of a new paragraph which will add a line break. So this part of the text will be shown on a new line
&SELECTEDVALUE(Comment[Text]): This time, the text is not hard coded but loaded from a table. We use the SELECTEDVALUE DAX function to show only the text which has been selected. Since the sample report only contains one row in the Comment table, the report always shows the same text. But in case your report contains more than one row, the SELECTEDVALUE statement will help you display the correct text. This functionality can actually not only be used on normal report pages but also in a report page tooltip where you show comments to the end-users.


Click here to get introduced to some of the most common HTML tags for formatting (bold, italic, underline, etc.)